Did you get this resolved yet? If not, maybe try this method…
1: Download and install to a 32 gig thumb drive the latest AllstarLink ASL 2.0.0.beta image — I use Etcher for this process,
2: Start up your Wyse 3040, hit Del several times during the beginning of the boot up so that it gets you to the bios setup screen,
3: Check your date & time – set it as needed, I have found if date off by far due to low on-board battery the system will hang, this has eaten my lunch more than once on occasion,
4: Select “Advance” tab, scroll down to “SATA MODE” and select “AHCI”, then scroll down more to “Boot Mode”, there you will have option for “Legacy/UEFI/Both” — even though mine said for “64 bit OS use Both” it didn’t work for me, finally I selected “Legacy” and off it went flying like a charm,
5: Then select “Boot Tab” — make sure that your thumb drive is in the number one spot (use the + or - move your selection up or down) and that your "SATA 0 (that’s a zero not a oh no) is in number two spot,
6: select Exit Tab, save and exit,
it should now boot and start the install process.
This worked for me on all the Wyse 3040’s, 5020’s, and 5060’s thin Clients here so hopefully it will work for you. No promises, no guarantees as they say.
The ASL Beta installs nice and clean — easy-peasy, and generally works well at first install either as a radioless node or radio node/repeater controller. As a repeater controller using the RIM-Maxtrac_RM interface between repeater/radio and Wyse machine it sets up and runs first go around — as long as you pay attention to what you are doing which I didn’t do a few times and it caused me pains in my you know what. If using the RIM-Maxtrac-RM I use the “simpleusb_tune” and not the usb_tune mode and all usually sets up and requires no further adjustments — of course that will depend on your radio(s) being used.
Well, KI5PHN’s solution didn’t work for me. My BIOS screen didn’t have those options, but here’s how I got it to work:
You’ll need a Debian installation ISO to boot off of (install it to a USB drive as a new bootable media). The small network installer is just fine - you’re not going to install Debian again, just use its rescue option. I used Debian 12, but back to version 10 (or even earlier) should probably have the same options.
Boot off the new Debian installer and enter “advanced options…” then “…graphical rescue mode”
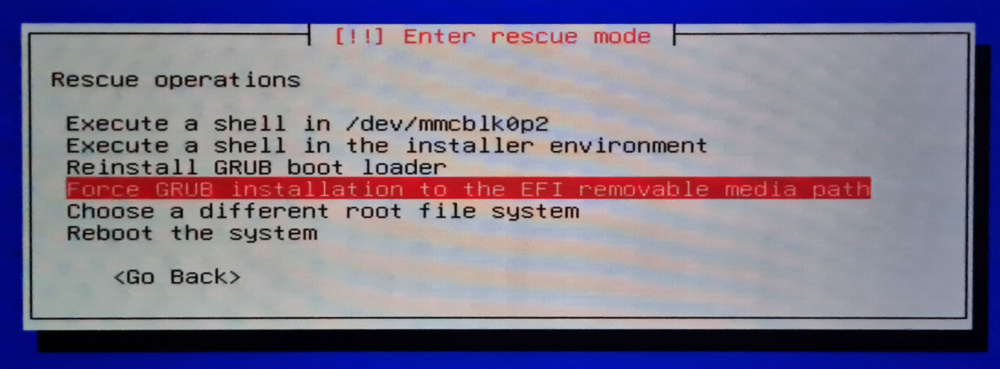
Go through as if you were going to install (accept the defaults, you’re not really going to use them), but eventually, after the installer detects disks, you’ll get to the “enter rescue mode”
Choose the /dev/mmcblk0p2 device to use for root
If it asks if to mount separate /boot/efi/, say yes (not all installs will ask this)
Next Execute a shell in /dev/mmcblk0p2 - which will open a shell on your ASL installation.
use grub-install to fix the issue - type: grub-install --target=x86_64-efi --efi-directory=/boot/efi --removable
Afterward, enter update-grub
Lastly, type exit then keep using continue back in the GUI until you get the reboot the system option
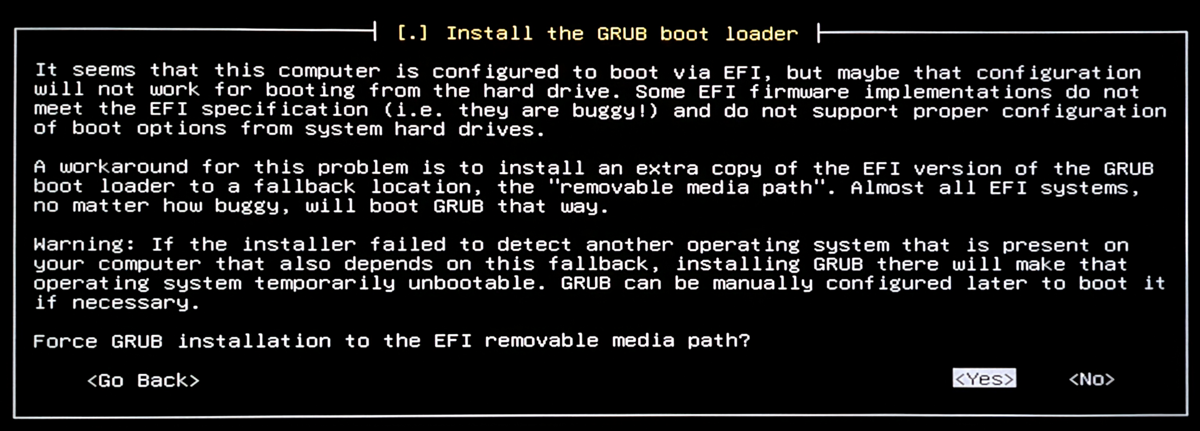
Above steps got me to the shell but then the shell did not recognize any grub commands. So I tried the below option (Force GRUB install…to EFI…) and now Debian 12 runs fine on my Dell Wyse 3040.
Update: Maybe I missed this before but when setting up another node today I tried “high-contrast”, “advanced” installer and it seems to better explain each step, eg. below. Select yes for this step.
Boot the 3040 from the USB drive and follow the menus to install Debian. (I prefer the “high-contrast”, “advanced” installer as it seems to better explain each step.) Select your desired desktop GUI (should be none if your 3040 has only 8GB eMMC, otherwise Xfce is recommended), and select “web server” and “SSH server” options to install.
When you are prompted to create a user account, do not enable a login/password for the root account (more secure and enables sudo), and be sure to write down the name & pass you enter for your user account.
The “Force GRUB install…to EFI…” option is required for Wyse 3040’s. Select yes for this step.